Battery switch on travel trailer function is crucial for managing your RV’s power. This guide breaks down everything you need to know about using, maintaining, and troubleshooting your travel trailer’s battery switch, from understanding the different types of switches to diagnosing common problems. We’ll cover safe operation, wiring diagrams, and even power conservation tips to help you maximize your off-grid adventures.
Whether you’re a seasoned RVer or a first-timer, mastering your battery switch is key to a smooth and enjoyable camping experience. We’ll demystify the process, making it easy to understand and confidently manage your RV’s power system. Get ready to become a battery switch pro!
Understanding Battery Switch Functionality in Travel Trailers: Battery Switch On Travel Trailer Function
Your travel trailer’s battery switch is a crucial component for managing your power sources, allowing you to easily switch between shore power, your house battery, and your auxiliary battery (if equipped). Understanding how it works is key to preventing battery drain and maximizing your off-grid camping experience. This section will explain the purpose and functionality of these switches.
Battery Switch Purposes
The primary purpose of a battery switch in a travel trailer is to isolate and control the flow of power from your batteries. This allows you to disconnect your batteries from the trailer’s electrical system when not in use, preventing accidental drain and protecting your batteries from damage. It also enables you to select which battery (or batteries) power your trailer’s 12-volt systems, which is helpful when you have multiple batteries for different purposes.
So, you’re planning a trip? Awesome! First things first: get travel insurance. Seriously, check out Aon travel insurance for solid coverage. Then, think about your in-flight entertainment. If you’re an audiophile, you’ll want to check out audiophile travel setup guides to ensure your listening experience is top-notch.
Proper planning makes for a smoother, more enjoyable trip!
For example, you might use one battery for house systems (lights, water pump) and another for dedicated running a dedicated appliance like a solar panel charging system.
Types of Battery Switches
Several types of battery switches exist, each with its own advantages and disadvantages. The most common types are the 1-2-Both-Off switch and various multi-pole switches.
- 1-2-Both-Off Switch: This is the simplest type, offering three positions: “1” connects only battery 1, “2” connects only battery 2, “Both” connects both batteries in parallel, and “Off” disconnects both batteries entirely. This is ideal for trailers with two batteries that are used in the same way.
- Single Pole, Double Throw (SPDT) Switches: These switches control a single circuit and can connect it to one of two sources or disconnect it entirely. This might be used to isolate a specific circuit or appliance from the battery.
- Double Pole, Double Throw (DPDT) Switches: These switches control two circuits simultaneously, often used in more complex systems with multiple batteries and more sophisticated power management.
More complex systems may use electronic switching systems with more options and features, like monitoring battery voltage and state of charge, often integrated into a larger battery management system.
Operating a Typical Battery Switch
Operating a typical 1-2-Both-Off switch is straightforward.
- Identify the switch: Locate the battery switch, usually found near the batteries themselves or in a convenient access panel. It will likely be a rotary switch with clearly labeled positions (1, 2, Both, Off).
- Turn the switch to the “Off” position: Before performing any maintenance or work on the electrical system, always ensure the switch is in the “Off” position to disconnect the batteries completely.
- Select the desired position: Rotate the switch to the desired position (“1”, “2”, or “Both”) to connect the selected battery or batteries to the trailer’s 12-volt system.
Always remember to turn the switch to the “Off” position when not using the trailer for extended periods to prevent battery drain.
Advantages and Disadvantages of Different Battery Switch Types
The choice of battery switch depends on your trailer’s electrical system complexity and your needs.
| Switch Type | Advantages | Disadvantages |
|---|---|---|
| 1-2-Both-Off | Simple, inexpensive, easy to use. | Limited functionality; only suitable for simple systems with two batteries used similarly. |
| SPDT | Versatile for isolating individual circuits or appliances. | Only controls one circuit at a time. |
| DPDT | Controls two circuits simultaneously, better for more complex systems. | More expensive and complex than simpler switches. |
Remember that safety is paramount when working with electrical systems. If you are unsure about any aspect of your trailer’s electrical system, consult a qualified RV technician.
Connecting and Disconnecting Batteries
Connecting and disconnecting your travel trailer’s house batteries to the main power source is a crucial step in managing your power supply. Understanding how to do this safely and correctly will help prevent damage to your batteries and electrical system, and ensure you have power when you need it. This section details the process, safety precautions, and how to check voltage and amperage.
The process involves using your battery switch to isolate the batteries from the trailer’s electrical system when not in use or to connect them to charge or power appliances. This switch is typically a multi-position switch allowing you to select between different power sources and configurations. Always refer to your specific trailer’s manual for the exact switch operation as variations exist.
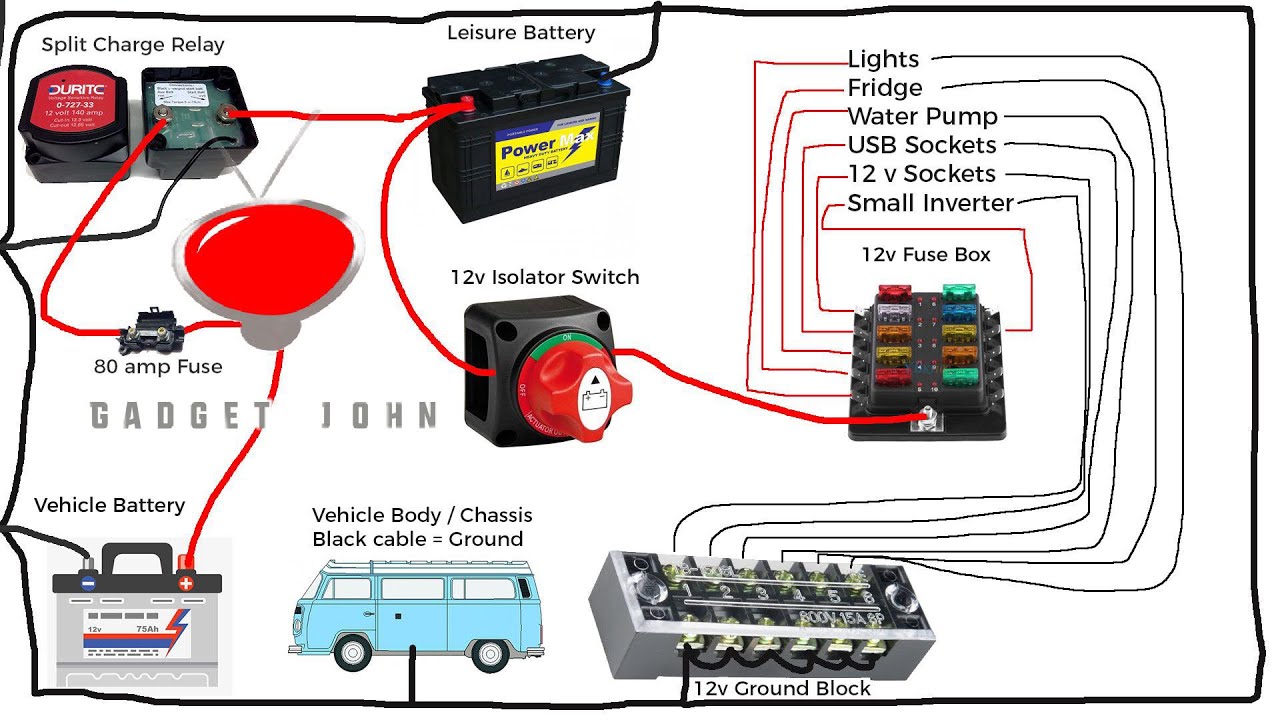
Battery Switch Operation and Wiring Diagram
A typical travel trailer battery system uses a battery switch to control the flow of power from the batteries to the trailer’s electrical system. The following table illustrates a common setup. Remember, your specific setup might vary slightly.
| Battery 1 | Battery 2 | Switch Positions | Load |
|---|---|---|---|
| Positive (+) terminal connected to switch | Positive (+) terminal connected to switch | Off: Batteries disconnected from load | No power to trailer circuits |
| Positive (+) terminal connected to switch | Positive (+) terminal connected to switch | Both Batteries: Both batteries supply power to the load | Power to trailer circuits from both batteries |
| Positive (+) terminal connected to switch | Positive (+) terminal connected to switch | Battery 1: Only Battery 1 supplies power to the load | Power to trailer circuits from Battery 1 only |
| Positive (+) terminal connected to switch | Positive (+) terminal connected to switch | Battery 2: Only Battery 2 supplies power to the load | Power to trailer circuits from Battery 2 only |
| Negative (-) terminal connected directly to the load | Negative (-) terminal connected directly to the load | All positions | Ground path for the load |
Note: This diagram shows a simplified system. Some systems may include additional components like a solar charge controller or an inverter. Always consult your trailer’s wiring diagram for the precise configuration.
Safety Precautions
Working with batteries and electrical systems requires caution. Always follow these safety precautions:
- Wear safety glasses to protect your eyes from potential splashes of battery acid.
- Wear gloves to protect your hands from acid and potential cuts.
- Ensure the area is well-ventilated to avoid inhaling potentially harmful gases.
- Disconnect the negative (-) terminal first when working on the battery system, and reconnect it last.
- Never allow metal tools to contact both battery terminals simultaneously, as this could create a short circuit.
- Turn off all power sources before working on the electrical system.
- Consult a qualified electrician if you are unsure about any aspect of the process.
Checking Voltage and Amperage
Before and after using the battery switch, you should check the voltage and amperage to ensure everything is working correctly. This helps identify any potential issues, such as a faulty battery or a problem in the wiring.
To check voltage, use a multimeter set to DC voltage. Connect the multimeter leads to the positive (+) and negative (-) terminals of each battery individually. A fully charged 12V battery should read approximately 12.6V. Lower readings indicate a partially discharged battery. To check the amperage, you would need an ammeter capable of measuring the current draw of your system.
This is typically done by connecting the ammeter in series with the circuit. This measurement would help identify excessive current draw indicating a potential short circuit.
Troubleshooting Common Battery Switch Issues
Your travel trailer’s battery switch is a crucial component, ensuring you can power your appliances and systems. When it malfunctions, however, your camping trip can quickly go south. Understanding common problems and how to troubleshoot them can save you frustration and potential downtime. This section will guide you through diagnosing and resolving issues with your battery switch.Troubleshooting a faulty battery switch often involves a systematic approach.
So, you’re planning a trip? Awesome! First things first: get yourself sorted with travel insurance. Check out Aon travel insurance for comprehensive coverage. Then, if you’re an audiophile like me, don’t forget your tunes! Planning your audiophile travel setup is key to enjoying your journey. Make sure to pack lightweight, high-quality headphones and a portable DAC for the best listening experience on the go.
Start by visually inspecting the switch and its connections, then move on to more advanced checks if necessary. Remember safety first – always disconnect the negative battery terminal before working on any electrical components.
Common Battery Switch Problems
Several issues can cause your battery switch to malfunction. These problems often manifest as subtle symptoms that can easily be overlooked. Addressing them promptly prevents more significant problems down the line.
- Corrosion: Over time, corrosion can build up on the battery terminals and switch contacts, hindering the flow of electricity. This is especially common in humid or salty environments.
- Loose Connections: Vibrations from travel can loosen connections at the battery terminals, the switch itself, or in the wiring leading to the switch. This can lead to intermittent power or complete failure.
- Switch Failure: The switch itself can fail due to wear and tear, manufacturing defects, or excessive current draw. This can result in the switch being unable to connect or disconnect the batteries properly.
- Wiring Issues: Problems within the wiring harness connected to the switch can also cause malfunctions. This might include broken wires, damaged insulation, or poor connections within the wiring loom.
Diagnosing Battery Switch Problems
Identifying the root cause of your battery switch issue requires a careful inspection and testing procedure. The following steps will help pinpoint the problem.
- Visual Inspection: Begin by visually inspecting the battery switch, terminals, and wiring for any signs of corrosion, loose connections, or physical damage. Look for discoloration, burning, or anything out of the ordinary.
- Voltage Testing: Use a multimeter to check the voltage at the battery terminals and at the switch terminals in different switch positions. Compare these readings to ensure that the voltage is consistent and matches the expected voltage of your battery bank. Low voltage readings may indicate a problem with the switch or wiring.
- Continuity Testing: Use a multimeter to test the continuity of the wiring between the battery terminals and the switch terminals. A lack of continuity indicates a break in the wiring.
Troubleshooting Flowchart
The following flowchart provides a visual guide to troubleshooting your battery switch:
Start --> Visual Inspection (Corrosion, Loose Connections, Damage)
    |-----> Problem Found?
    |        |-----> Yes --> Clean/Tighten/Repair --> Test --> Working?
    |        |             |-----> Yes --> End
    |        |             |-----> No --> Replace Switch/Wiring --> Test --> Working?
    |        |                       |-----> Yes --> End
    |        |                       |-----> No --> Seek Professional Help --> End
    |-----> No --> Voltage Test
            |-----> Voltage Low/Inconsistent?
            |        |-----> Yes --> Continuity Test --> Problem Found?
            |        |             |-----> Yes --> Repair Wiring --> Test --> Working?
            |        |                       |-----> Yes --> End
            |        |                       |-----> No --> Replace Switch/Wiring --> Test --> Working?
            |        |                               |-----> Yes --> End
            |        |                               |-----> No --> Seek Professional Help --> End
            |        |-----> No --> Switch Likely Working Correctly --> End
Maintenance and Upkeep of the Battery Switch

Keeping your travel trailer’s battery switch in top condition is crucial for reliable power and preventing costly repairs. Regular maintenance ensures smooth operation and extends the lifespan of both the switch and your batteries. Neglecting this can lead to corrosion, poor connections, and ultimately, battery failure.
Regular maintenance prevents problems before they start. A simple inspection routine can save you significant time and money in the long run, avoiding the need for more extensive repairs. This includes cleaning terminals, checking for loose connections, and visually inspecting the switch itself for damage.
Regular Maintenance Schedule
A regular maintenance schedule for your battery switch should be part of your overall travel trailer pre-trip and seasonal checklists. Consider these intervals:
- Pre-Trip Inspection: Before each trip, visually inspect the switch for any signs of damage, loose connections, or corrosion. Lightly tighten any loose connections.
- Monthly Inspection (if regularly used): If you use your travel trailer frequently, perform a more thorough inspection monthly. This includes cleaning the terminals and checking for any signs of wear and tear on the switch itself.
- Seasonal Inspection (if stored for extended periods): Before storing your trailer for an extended period (winter, for example), disconnect the batteries, clean the terminals thoroughly, and apply a corrosion inhibitor to protect them. Inspect the switch for any damage and lubricate any moving parts as recommended by the manufacturer.
- Annual Inspection: At least once a year, conduct a comprehensive inspection of the battery switch. This should include a thorough cleaning, checking all connections, and visually assessing the switch’s overall condition. If you notice any significant wear or damage, consider replacing the switch.
Cleaning and Inspecting Battery Switch Terminals
Corrosion on battery terminals is a common problem that can severely hinder electrical conductivity. This leads to reduced battery life and can even cause overheating and damage to the battery switch.
To clean the terminals, you’ll need a wire brush, baking soda, water, and a protective glove. First, disconnect the batteries from the switch. Then, use the wire brush to remove any loose corrosion. Next, make a paste of baking soda and water and apply it to the terminals. Let it sit for a few minutes to help neutralize any acid build-up.
Scrub the terminals again with the wire brush and rinse them thoroughly with water. Finally, dry the terminals completely before reconnecting the batteries.
Best Practices for Extending Battery Switch Lifespan
Several practices contribute to a longer-lasting battery switch:
- Use dielectric grease on terminals after cleaning to prevent future corrosion.
- Ensure proper tightening of all connections to avoid loose wires.
- Avoid excessive vibration by securing the switch properly.
- Protect the switch from the elements (rain, snow, etc.) using a cover if necessary.
- Choose a high-quality battery switch from a reputable manufacturer.
Replacing a Faulty Battery Switch, Battery switch on travel trailer function
If your battery switch is malfunctioning or showing significant signs of wear, replacement is necessary. This is a relatively straightforward process, but it’s essential to disconnect the batteries before starting.
Here’s the process:
- Gather Tools and Materials: You’ll need a new battery switch, appropriate sized wire nuts or connectors, a screwdriver (likely Phillips head), wire cutters/strippers (if necessary), and possibly a wrench for the battery terminals.
- Disconnect the Batteries: Disconnect the negative (-) terminals first from both batteries, then disconnect the positive (+) terminals. This prevents accidental short circuits.
- Remove the Old Switch: Unscrew the old battery switch from its mounting location. Take note of how the wires are connected for easy re-installation.
- Install the New Switch: Mount the new switch securely in the same location as the old one. Make sure the switch is firmly attached.
- Reconnect the Wires: Connect the wires to the new switch, matching them to the connections on the old switch. Use wire nuts or connectors to secure the connections and prevent corrosion. Apply dielectric grease.
- Reconnect the Batteries: Reconnect the positive (+) terminals first, then the negative (-) terminals. Double-check all connections before turning on any appliances.
- Test the Switch: Test the switch by turning it on and off, verifying that power is correctly routed to the batteries and appliances.
Understanding your travel trailer’s battery switch is essential for safe and efficient power management. By following the tips and troubleshooting steps Artikeld here, you can confidently operate your system, extend the life of your battery and switch, and enjoy worry-free off-grid adventures. Remember regular maintenance is key – a little preventative care goes a long way!
FAQ Insights
What happens if I leave my battery switch in the “off” position for an extended period?
Leaving the switch off for long periods is generally fine, but it prevents charging of the house batteries from the tow vehicle. Ensure your batteries are charged before prolonged storage.
Can I use a different type of battery switch than what came with my travel trailer?
Yes, but ensure the replacement switch has the correct amperage rating and wiring configuration to match your trailer’s electrical system. Incorrect installation could damage your system.
My battery switch feels hot to the touch. Is this normal?
A slightly warm switch is acceptable, but excessive heat indicates a problem, likely high amperage draw or a loose connection. Investigate immediately to avoid damage or fire hazard.
How often should I clean my battery switch terminals?
At least twice a year, or more often if you notice corrosion. Regular cleaning prevents poor connections and ensures optimal performance.
